Search This Blog

Showing posts with label Tricks. Show all posts

Thursday, June 18, 2020

article logoHow to create worksheet index in Excel with VBA

The title above I think describing everything, even though I would like to explain the title briefly. Like you have a Workbook in excel containing 20+ or more sheets and its very annoying to navigate from one sheet to another by scrolling the scroll bar. There are many ways to do the navigation. By right-clicking on the lower-left corner (shown in the picture in red circle) of the sheets navigation panel, you can activate the navigation box and you can scroll to your desire sheet to navigate.
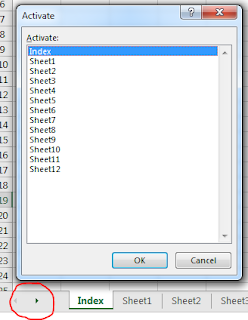

But today my topic is to do it in VBA and to create a list of all sheets in one index sheet and all available sheets will have the link to return in the index sheet.

Friday, May 8, 2020

article logoLeila Gharani, is an Excel Microsoft MVP

Leila Gharani, is an Excel Microsoft MVP, has explain all the excel problems and solve them very easiest way. Conception and presentation is highly appreciated. I am a big fan of her. Most of my excel knowledge I am getting from her Youtube channel and thorough her Website

Have look on her youtube channel and website. You will love it. guaranteed.

Friday, May 6, 2011

article logoHow to add scroll Message on Blogger Title Bar

Adding Scrolling Message on Blog Title & Browser Title bar are simple an easy steps.
First log in your account. Go to Design>>Edit HTML
Now Find this code below :
<b:skin><![CDATA[/*
Above/befor this code Paste the below code:

<script type='text/javascript'>
//<![CDATA[
msg = "Your Message goes here";
msg = " ....." + msg;pos = 0;
function scrollMSG() {
document.title = msg.substring(pos, msg.length) + msg.substring(0, pos); pos++;
if (pos > msg.length) pos = 0
window.setTimeout("scrollMSG()",200);
}
scrollMSG();
//]]>
<script> 
Put your Message on "Your Message goes here" & Enjoy! the scrolling on taskbar & titlebar.

Saturday, April 9, 2011

article logoHow to Install Windows XP More Faster

This is a simple tricks to Installing Windows XP in 10-15 Minutes. It will very helpful those who frequently install windows XP. Generally we see that XP Installation takes more than 39 Minutes and its' goes absolutely true when your computer RAMs are minimum. These simple steps are for those type of user who watns to reduce the OS XP Installation time.
Now I'll teach you these simple steps :
1. Insert an XP Bootable CD/DVD on your ROM
2. Reboot your system. It's will automatic ask to boot from CD/DVD ROM. Press any key.
3. Format your destination drive and setup will automatically loaded all necessary file.
4. As soon as the 256 Color part is complete and gone away you will enter the Graphical User Interface (GUI) area as like as below screen.

Wednesday, February 2, 2011

article logoHow to Remove Windows Genuine Advantage WGA

Windows Genuine Advantage is a software anti-piracy program started by Microsoft in 2005. It enforces the online validation of some of the Microsoft products. It is automatically installed if Windows Automatic Updates are enabled. If goes to the Windows Update site, it will ask you for installing this validation tool before you can select the updates from the Microsoft update website. By accepting to install this validation tool, anActiveX component in Internet Explorer is installed.

If, for some reason, this tool fails to validate your Windows, then it’ll always show you a warning that you may be a victim of software counterfeiting and that your Windows is not genuine. It will show up on your logon screen and make you wait for some seconds. And when you logon, it will just site in your status bar and will keep annoying you.
To Remove this tools from logon screen and also status bar Its need to Validate your windows or other hand Re-installing the Windows.

Monday, December 6, 2010

article logoMetacreation : KPT Vector Effects 1.5 (Plugins for Illustrator)

KPT Vector Effects 1.5 is a fantastic plug-in. It adds so much more creativity to Illustrator that I have to contemplate how I ever lived without it before.

The interface is very simple and easy to follow, user friendly indeed. And if you are really uncertain how to use this veritable treasure chest of effects, it comes equipped with a PDF file. The plug-in program is otherwise very self-explanatory.


The opportunities for variety are endless making this plug-in a valuable asset to any Illustrator/designer. The fun part about it is that once you discover an effect you like, you can then go and apply another effect on top of that. Some plug-ins for Illustrator won't let you do that. It certainly cuts down design time as well.

Friday, November 12, 2010

article logoWindows Seven themes Create yourself

Every time we use Windows Defaults or third party theme pack download via internet. Only too much little people use their own theme on windows. Because there were no tools or options to create a theme in windows 98, 2000, ME, XP or vista. But now on Windows 7 break those all law of windows. Here you can create a theme and use it on your own pc and also share it with your friends and others. To create theme in Windows 7, there is no need any experience. I'll see you here how the procedure....


>> Suppose, You have a theme installed on your PC. Now Right click on desktop and go Personalize.
Starting for top left side. At first click on ‘Change Desktop Icons’.

>>Now click on these icon which you want to change and click change icon. Select your desire icon and click OK. If you not find any likeable Icon in your System then download from internet. There have a lots. Put tick mark on 'Allow themes to change desktop icons'. The press Apply and Ok.

Saturday, September 25, 2010

article logoফোল্ডার অপশন হারিয়ে গেলে কী করবেন?


অনেক সময় টুলস্ মেনুর অধীনে
চিত্র-১ : ফোল্ডার অপশন

ফোল্ডার অপশন হারিয়ে যায় । এটি না থাকলে অনেক বিপত্তিতে পরতে হয়। ধরুন আপনি অপনার কোন গুরুত্বপূর্ন ফোল্ডার বা ফাইল হিডেন করে রেখেছেন কিন্তু আপনার এই ফোল্ডার অপশন হারিয়ে গেছে । এখন আপনি ঐ ফোল্ডার খুলতে পারবেন না।এখন এই অপশন ফিরিয়ে আনতে আপনাকে যা করতে হবে।
স্টার্ট মেন্যুতে ক্লিক করে রান এ ক্লিক করতে হবে (এই রান কমান্ড আপনি কি বোর্ড থেকে উইন্ডোজ কি+R চেপে ও পেতে পারেন)।
চিত্র-২ : টাইপিং রান কমান্ড

এরপর রান কমান্ডে  gpedit.msc লিখে  OK তে ক্লিক করতে করুন।